Ingredientes:
- 250 g. de harina de todo uso tamizada
- 200 g. de azúcar blanquilla
- 4 huevos M
- 250ml. de leche
- 50 g. de aceite de girasol
- 120 g. de mantequilla a temperatura ambiente o en pomada
- 1 sobre de levadura química, unos 16 g.
- 1 c.c. de sal
- 1 c.c. de esencia o pasta de vainilla
- 1 manzana reineta (amarilla), 1 manzana red delicious (roja), 1 manzana granny smith (verde)
- las pieles y corazones de las manzanas
- 100 g. de azúcar glas, ya sabéis que uso glacé seda de azucarera, es extrafino, o lo hago casero
Elaboración:
Batir la mantequilla y el azúcar con varillas o con un robot con el batidor plano con agujeros, que va muy bien para este tipo de masas, pero no os preocupéis con varillas si tenéis la matequilla muy blandita os servirá perfectamente. Batir hasta integrar perfectamente, hasta que el azúcar no se note en la mezcla. Añadir los ingredientes líquidos, uno a uno, sin dejar de batir, es decir, la esencia de vainilla, el aceite y la leche. Cuando todo esté muy homogéneo ir añadiendo los huevos uno a uno.
Es el momento de incorporar los ingredientes secos, en este caso la harina y el impulsor tamizado, que también os recomiendo hacer en tres golpes, por ejemplo.
La masa queda como un batido algo líquida, pero no en exceso. Preparar el molde de bundt bien untado con mantequilla, volcar el batido y meter en el frigorífico. Un truco muy bueno para que después se despegue mejor, es untar el molde, muy bien por todas las aristas y meter a enfriar.
Precalentamos el horno a 180ºC. y preparamos las manzanas para el relleno cortándolas en taquitos pequeños sin piel ni pepitas. Sacamos el molde del frío y repartimos las manzanas por toda la superficie. Podéis hundirlas un poco, pero realmente no es necesario porque durante el proceso de subida el propio bizcocho las cubrirá, aunque no es mala idea empujarlas un poquito para que no se queme la parte más superficial.
Deberá hornearse durante no menos de 45 minutos, pero ya sabéis que dependerá mucho de vuestro horno. Después de hacer la subida, unos 30 minutos más o menos podéis abrir la puerta y pinchar justo en el centro para comprobar que sale limpio, pero en este caso y siempre que haya un ingrediente como la fruta, puede parecer que está sin hacer porque al pinchar la manzana manchará la brocheta. Asi que para que no haya error, dejar que hornee al menos los tres cuartos de hora y pinchar, si sale más o menos limpio, apagar el horno y dejar que termine de hacerse dentro.
Sacar del horno y con mucho cuidado darle la vuelta sobre una rejilla. Dejar que caiga sólo, ése es el único misterio de los bundt, deben caer sólo, porque de otra forma perderán su preciosa forma.
Mientras vamos a preparar una glasa un poco especial y aunque lo hago al final de la receta, os recomiendo que tengáis hecho el agua de manzana antes para darle tiempo a enfriar. Es tan sencillo como con todas las pieles y corazones de las manzanas que hemos pelado ponerlas a hervir en un poco de agua, con un vasito será más que suficiente. Dejar que coja bien el sabor, con diez o quince minutos de cocción es suficiente. Podéis añadirle unas gotitas de limón para que no oscurezca. Dejar que enfríe sin retirar nada. En un bol ponemos el azúcar glas y con una varilla pequeña o con un tenedor vamos batiendo añadiendo el agua de cocción bien colada y bien fría acordaros, de cucharada en cucharada, hasta conseguir una pasta blanca y densa. Esta elaboración tan sencilla es la glasa al agua.
Cuando el bundt haya caído lo pondremos en el plato o bandeja donde lo vayamos a presentar. Como os habréis dado cuenta añadimos las manzanas cortaditas arriba, por lo tanto ahora como le hemos dado la vuelta las tendremos en gran medida en la parte de abajo, que es lo que queríamos conseguir.
Cortamos unos gajos de manzana que frotaremos levemente con limón para que no se oxiden. Cubrimos la parte superior del bund con la glasa que al haber reposado un rato deberá tener una consistencia durita pero debe caer de la cuchara sin ayuda. Podéis hacerlo en dos veces dejando secar la primera totalmente, el efecto es precioso. Justo antes de servir nuestro precioso bundt colocamos en el agujero gajos de manzana de las tres variedades elegidas.
Nota: como ya sabéis muchas de vosotras el bundt debe su nombre al molde en el que se hornea, que tiene la particularidad de tener forma de corona con un tubo central que deja pasar el calor y el exterior con aristas, más o menos pronunciadas, dando como resultado unos bizcochos de formas espectaculares. Yo sólo tengo éste sencillo que véis en las fotos, tengo que comprarme otro lo reconozco, pero la marca que los hace de muy buena calidad, por cierto, y que muchas conoceréis, son algo caros asi que lo tengo como pendiente.
Otra nota: Como podéis ver en las fotos de corte del bizcocho, el interior es húmedo, porque al llevar las manzanas quedan partes muy blanditas porque la trocitos de las manzanas se funden con la masa. Es un auténtico placer.
Versión en inglés:
Ingredients: 250 g. sifted flour all use, 200 g. of white sugar, 4 eggs M, 250ml. milk, 50 g. sunflower oil, 120 g. of softened butter or cream, 1 packet of baking powder, about 16 g., 1 tablespoon of salt, 1 tablespoon of essence or vanilla paste, One russet (yellow), 1 red delicious apple (red), 1 Granny Smith apple (green), the skins and hearts of apples, 100 g. icing sugar, you know that use silk icing sugar, is superfine, or do home
Ellaboration: Beat butter and sugar with rods or a robot with the flat beater with holes, which is great for this type of mass, but do not worry if you have rods very squishy Butter will serve you well. Beat until well until the sugar is not noticeable in the mix. Add the liquid ingredients, one by one, stirring constantly, ie, vanilla extract, oil and milk. When everything is very homogeneous gradually add the eggs one by one. It is time to incorporate the dry ingredients, in this case sifted flour and impeller also recommend doing three strokes, for example. The dough is something like a liquid batter, but not excessively. Prepared bundt pan well buttered, pour the batter and put in the refrigerator. A very good trick to better off then, is greasing, very well by all the edges and put to cool. Preheat oven to 180 ° C. and prepare apples for the filling by cutting them into small diced skinless seeds. We get the cold cast and hand out apples across the surface. You can sink them a little, but not really necessary because during the ascent the cake itself will cover, but not a bad idea to push a little more superficial part does not burn. It must be baked for at least 45 minutes, but you know that depend heavily on your oven. After making the climb, about 30 minutes or so you can open the door and punch right in the center to make sure it comes out clean, but in this case and whenever there is an ingredient such as fruit, it may appear that he is doing because apple punch stain the skewer. So that there be no mistake, let bake at least three quarters of an hour and prick, if it goes more or less clean, turn off the oven and let it be finished inside. Remove from oven and carefully flip it on a rack. Just let it fall, that's the only mystery of bundt, they should fall only, because otherwise they will lose their beautiful shape. While we will prepare a special glaze a bit and although I do at the end of the recipe, I recommend that you may have made the water block before to give it time to cool. It is as simple as with all skins and hearts of peeled apples have them to boil in a little water, with a glass will suffice. Let take the flavor, with ten or fifteen minutes of cooking is enough. You can add a few drops of lemon to dark. Let cool without removing anything. In a bowl we put the icing sugar and a small rod or a fork we go beating well adding water wash and cold Acordaros cooking, scoop in Scoop, until a thick white paste. This simple preparation is the icing water. When it will bundt has fallen on the plate or tray where we are going to present. As you may have noticed we add up apples cut up, so far as we've gone around the have heavily on the bottom, which is what we wanted to achieve. Cut each apple slices lightly rub with lemon to avoid rusting. We cover the top of the bund with the glaze that having rested a while must have a chewy consistency but should drop from the spoon without help. You can do it twice the first allowed to dry completely, the effect is beautiful. Just before serving our precious bundt hole placed in the apple slices of three varieties chosen.
Ingredientes para el bizcocho:
- 4 huevos
- una pizca de sal
- 2 vasos de agua de azúcar
- 1 vaso de agua de leche
- 1 vaso de agua de aceite de girasol
- 3 vasos de agua de harina para todo uso
- 1 sobre de levadura química (impulsor)
Ingredientes para la crema de mantequilla:
- 100 g. de ázucar glas, yo uso glacé de Azucarera
- 100 g. de mantequilla a temperatura ambiente
- 1 c.c. de esencia de vainilla casera
Ingredientes para el chantilly:
- 200 g. de nata para montar, ya sabéis debe tener más de un 30% de MG
- 100 g. o menos de azúcar blanquilla
- 1 c.c. de esencia de vainilla casera
Otros ingredientes:
- frutas frescas o en almíbar, las que más os gusten. Yo he elegido fresas, que estamos en época y unas guindas rojas que me pidió mi hija.
Elaboración del bizcocho:
Ya hemos hecho muchos bizcochos, creo que todos muy sencillos y sé que ya hemos utilizado el de medidas anteriormente. Esta vez está hecho totalmente a propósito. Quiero demostraros que se pueden hacer bizcochos sencillísimos, con muy pocos ingredientes, prácticamente con cosas que tenemos en casa todos los que cocinamos para nuestras familias. Lo único que habría que comprar a propósito es el impulsor para ayudar a que el bizcocho esponje.
Así que como siempre, encendemos el horno a 180ºC y preparamos todos nuestros ingredientes. No hay que pesar, no hay que tamizar. Un vaso, un bol grande y una varilla, aunque si tenéis alguna eléctrica aún es más sencillo, serán todas vuestras herramientas. Bueno, el molde y el horno también son importarntes, claro.
Empezamos blanqueando muy bien los huevos. Me gusta que vayan muy batidos, de hecho yo no preparo los ingredientes hasta que dejo los huevos con la pizca de sal batiendo. Cuando están muy blanquitos, unos cinco minutos de batido eléctrico estará bien, añadimos el azúcar por una de las paredes del bol para que no caiga de golpe y nos baje el volúmen, aunque como ya os he dicho en otras ocasiones al llevar el impulsor no podríamos tener tanto cuidado, pero yo creo que mejora mucho el resultado final. Seguimos batiendo. Añadimos el aceite a chorro fino por un lateral y seguimos batiendo. Y terminamos los ingredientes líquidos con la leche con el mismo procedimiento. Mezclamos la harina con el impulsor y se lo añadimos vaso a vaso. En este punto podemos para de batir o hacerlo a muy baja velocidad, y mezclar con espátula.
Tendremos preparado un molde rectangular en mi caso, pero cualquiera que tengáis por casa servirá, con las paredes cubiertas de papel. Para que el papel no se arrugue mucho y no queden las paredes algo irregulares hay varios truquillos. Uno es cortar dos rectángulos, uno con el ancho de los laterales pequeños y otro más ancho para los laterales grandes, que cubra de lado a lado, aunque se crucen en el centro. Otra posibilidad es cortar un cuadrado grande colarlo en el interior y después hacer cuatro cortes justo por las cuatro esquinas del molde de arriba hasta el fondo, después cruzamos un poco para ajustar. Y yo uso muchas veces una técnica muy depurada que consiste en mojarme levemente las manos, coger el papel y arrugarlo muy bien, y después colacarlo en el molde. Elegir la que más os guste. Volcar el batido dejando unos dos dedos en el borde, como tres cuartas partes del molde y hornear alrededor de 45 minutos. Horno de 180º C., calor arriba y abajo, sin ventilador, bandeja central o una más abajo. El tiempo total ya sabéis que varía mucho con el horno, puede ser algo más sin ningún problema, pero nunca abráis la puerta hasta que haya terminado la subida, nunca antes de los 30 minutos porque tendréis muchas posibilidades de que se baje.
Una vez horneado, lo sacamos y lo dejamos enfriar sobre una rejilla antes de desmoldar. Si no tenéis rejilla, no importa, poner algo para que apoye dejando la parte centra de la base al aire, porque es ahí donde más calor guarda y más tiempo tarda en enfriarse. Una vez totalmente frío, desmoldar.
Elaboración de la crema de mantequilla:
Cuando nos dispongamos a realizar el bizcocho sacar la mantequilla y dejar que atempere. No pasa nada porque sea de un día para otro. Lo importante es que esté blanda, no desheche, no vale calentarla en el microondas ni al fuego. Debe estar a temperatura ambiente, ése es el único secreto. Pero como para todo hay un truquillo. Si se os olvida podemos poner en un cuenco agua templada del grifo, a unos 25ºC., por ejemplo, no mucho más, y meter la mantequilla, sin film, sin papel, sin nada, la mantequilla en un pequeño bloque, unos minutos. Cuando al tocarla esté muy blandita, cogerla con una mano y dejar que caiga, sin aplastarla, simplemente que caiga todo el exceso de agua. Ese es el punto que deberá tener.
Batir la mantequilla hasta que quede muy blanquita. Lo mejor es usar la pala de la amasadora, la que tiene forma como de hoja agujereada. Y una vez muy batida vamos incorporando el azúcar glas a cucharadas. Cuando terminemos de incorporar el azúcar añadimos la esencia de vainilla. Seguimos batiendo hasta que cambie el sonido. empieza a sonar como más plof, no sé muy bien explicaros este momento, pero os garantizo que si estáis atentos lo notaréis perfectamente. Pasar la crema a una manga pastelera con boquilla rizada, y dejar en la encimera, porque si la guardáis en frío endurecerá mucho y no se podrá manejar bien. Pero si no tenéis no os preocupéis, se puede extender perfectamente con un cuchillo romo o cualquier espátula.
Elaboración de la crema chantilly:
Para montar la nata os recomiendo que esté muy fría, yo si no la tengo en el frigorífico, la dejo una horita en el conge. Se montará en un momento. Batir enérgicamente con varillas o con alguna máquina eléctrica que tengáis en casa y cuando esté ya bastante montada, pero no demasiado dura todavía, añadirle el azúcar en dos o tres veces y la esencia de vainilla. Este no es más que un truquillo para cuando la montéis a mano, porque de esta forma conseguimos que la mezcla no pese tanto y es más fácil montarla. Meter en manga pastelera con otra boquilla rizada, o en un cuenco en el frigorífico.
Montaje de la tarta:
Cortar el bizcocho en dos mitades. Si ha subido mucho podéis cortar la parte de arriba para dejarlo recto y esas láminas mojarlas en colacao.
Cortar unas fresitas en cuadraditos pequeños y las más bonitas dejarlas para decorar la parte superior.
Extender la nata enla parte de abajo del bizcocho, una buena capa. Cubrirla con las fresitas cortadas. Si tenéis miedo de que se os baje podéis en este punto congelarla un par de horas y así os aguantará perfectamente la parte de arriba.
Colocar la otra mitad encima y cubrirla, bien con una espátula, o cuchara, o con manga, como podáis y vuestros medios e imaginación os dejen, Adornar con las fresas enteras y unas guindas partidas a la mitad.
Nota: en realidad no es una tarta... tarta, es un bizcocho muy sencillo que he rellenado porque tenía unas ganas de comer un postres dulce muy dulce y con muchas calorías, y tenía un bizcochito de los miles que hago para desayunar mis hijos y una noche loca lo hice. Éste es el resultado. Muy fácil y resultón.Espero que os guste.
Versión en inglés:
Ingredients for the cake: 4 eggs, a little bit of salt, 2 glasses of sugar water, water 1 cup milk, 1 cup water sunflower oil
Water 3 cups of all-purpose flour, 1 packet of baking powder (driver)
Ingredients for butter cream: 100 g. icing sugar, Sugar glacé use, 100 g. butter at room temperature, 1 D.C. homemade vanilla essence
Ingredients for the chantilly: 200 g. whipping cream, you know you must have more than 30% of MG, 100 g. or less of white sugar, 1 D.C. homemade vanilla essence
Other ingredients: fresh or in syrup fruits, you are most like. I picked strawberries, which are in season, and red cherries that my daughter asked me.
Elaboration of cake: We have already made many cakes, I think it all very simple and I know we have used the above measures. This time it is made entirely on purpose. I want to show you that you can make the simplest of cakes, with very few ingredients, practically with things we have at home all we cook for our families. All I have to buy a purpose is to help drive the cake fluffy. So as usual, we turn on the oven to 180 ° C and prepared all of our ingredients. Do not weigh, do not sift. A glass, a large bowl and a stick, even if you have some power is even easier, are all your tools. Well, the mold and the furnace are also importarntes, of course. Whitening eggs started very well. I like to go very beaten, in fact I do not prepare the ingredients until they leave the eggs with a pinch of salt beating. When they are very white boys, about five minutes of power smoothie will be fine, add the sugar one of the walls of the bowl does not fall suddenly and we lower the volume, although as I have said on other occasions to carry the driver no we could be so careful, but I think the end result is much improved. We continue beating. Add oil in a thin stream down the side and continue beating. And we end the liquid ingredients with the milk with the same procedure. Mix the flour with the drive and add it to glass cup. At this point we can do to beat or at very low speed and mix with a spatula. We prepared a rectangular mold in my case, but whatever will you have at home, with walls covered with paper. So that the paper is not too wrinkled and there are no walls there are several tricks somewhat irregular. One is to cut two rectangles, one with small lateral width and wider for other large side, covering from side to side, but intersect at the center. Another possibility is to cut a large square strain it inside and then make four cuts right through the four corners of the mold top to bottom, then crossed a little to adjust. And I use a very refined technique of slightly wet my hands, crumpling up the paper and fine, and then the mold colacarlo many times. Choose the one you like. Pour the batter leaving about two fingers on the edge, as three quarters of the pan and bake about 45 minutes. 180 ° C. oven, top and bottom heat, fan, central tray or below. The total time you know it varies greatly with oven, can be more without any problem, but never open your door until you have finished the climb, ever 30 minutes because you will have many opportunities to get off. Once baked, we take it out and let cool on a wire rack before unmolding. If you have no grill, no matter, put something to support leaving the base part focuses on the air, because that is where most stores heat and the longer it takes to cool. Once a totally cool, unmold.
Elaboration of the buttercream: When we prepare to make the cake to remove the butter and let it temper. Nothing happens because it is from day to day. The important thing is that is soft, do not dispose of it dont heating in the microwave or fire. You must be at room temperature, that is the only secret. But as for everything there is a trick. If you forget we can put in a bowl warm tap water, about 25 ° C., For example, not much more, and put the butter, no film, no paper, no nothing, butter in a small block, a few minutes. When the touch is very squishy, catch it with one hand and let it fall, without crushing it, just to drop all excess water. That is the point we should take. Beat butter until very blanquita. It is best to use the bucket of the mixer, which is shaped like perforated sheet. And a very beaten once we incorporate a spoon icing sugar. When we finish add the sugar we add the vanilla essence. We continue beating until you change the sound. begins to sound like more Plop, I do not quite know to explain right now, but I guarantee that you will notice if you are tuned perfectly. Pass the cream to a pastry bag with curly tip and leave on the counter, because if you keep it cold harden much and you can not handle well. But if you have not do not worry, you can extend perfectly with a dull knife or spatula.
Elaboration of the whipped cream: To whip the cream I recommend that is very cold, I do not have it in the refrigerator, let it for an hour in the conge. It will be assembled at a time. Beat vigorously with rods or with an electrical machine that you may have at home and when assembled enough, but not too hard yet, add sugar two or three times and vanilla essence. This is just a trick for when montéis hand, because this way we get the mixture does not weigh much and is easier to assemble. Place in pastry bag with another curly tip, or in a bowl in the refrigerator.
Assembling the cake: Cut the cake into two halves. If you have increased much you can cut the top to let those straight and dip them in chocolate milk plates. Cut some strawberries into small squares and the nicest leave to decorate the top. Spread the cream inthe bottom of the cake, a good coat. Cover with cut strawberries. If you fear that you get off at this point you can freeze a couple of hours and so will perfectly endure the top. Place the other half on top and cover well with a spatula or spoon, or manga, as you can and your means and imagination you leave, garnish with whole berries and some cherries, halved.
Ingredientes:
- 475 g. de harina de fuerza
- 25 g de harina integral
- 330 g. de agua
- 10 g. de sal fina de mesa
- 5 g. de levadura fresca de panadero , o 1,5 g. de levadura seca
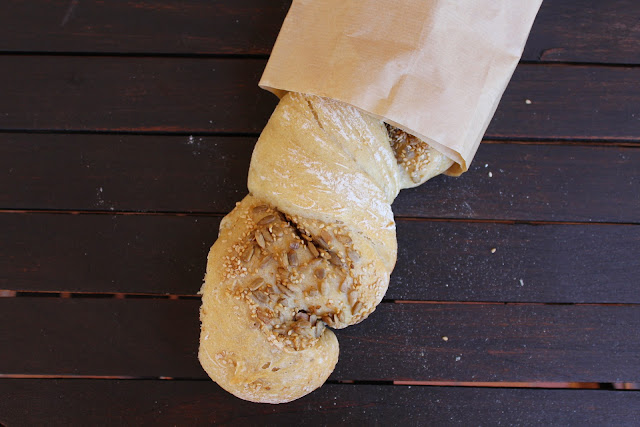
- 150 g. de mezcla de semillas, en mi caso he usado sésamo negro, pipas y amapola
Elaboración:
Esta masa es muy fácil de hacer, y además como podéis comprobar por el título del post no necesita saber amasar, pero tampoco necesitamos ningún saber en formar masas para su horneado. Es tan fácil como parece y las proporciones son exactas, por supuesto. Estamos hablando de Ibán Yarza, uno de los grandes maestros panaderos que nos enseña con sus libros a hacer pan en casa de forma muy natural y sin complicarnos la vida, como con esta receta.
Como no vamos a amasar, él nos recomienda disolver la levadura en un poco del agua de la receta, tibia, a unos 25ºC, Lo que necsitamos es que no esté ni caliente ni fría, para que la levadura pueda empezar a trabajar y ésa es su temperatura favorita. Lo hacemos aplastándola entre los dedos en un bol ayudándonos del agua. Dejar aparte mientras preparamos el resto de los ingredientes.
En un bol más grande añadimos el resto de los ingredientes, excepto las semillas, y los mezclamos enérgicamente. Cuando aprendes a amasar pan, los profes lo primero que te dicen es que este paso lo hagas con una sola mano, en mi caso la derecha claro, o incluso con una rasqueta de panadero, porque de esta forma tienes la otra libre para trabajar sin manchar. La izquierda en este caso la vamos a utilizar para ir dando vueltas al bol a la vez que mezclamos los ingredientes para asegurarnos que se integran perfectamente. Le añadimos el agua con la levadura y seguimos integrando. En dos o tres minutos estará más que lista. No estamos amasando, estamos uniendo los ingredientes.
Debe quedar una masa muy pegajosa debido a su alto contenido en agua, fijaros que es un 66% del total de la receta. Si no lo estuviera añadirle un poco de agua cucharada a cucharada hasta conseguir ese efecto de pegajoso y húmedo. Ahora la debemos dejar reposar unos cinco minutos, a no ser que haga mucho frío, que podrían ser 10 perfectamente.
Pasado el primer reposo cogemos con una mano como un tercio de la masa por uno de los bordes, alargamos con fuerza hacia arriba y hacia nosotros, y la doblamos sobre sí misma. Tapar con film perfectamente para que no entre nada de aire y no se seque y guardar en el frigorífico toda la noche. El frío es buen amigo de las masas, les ayuda a madurar, la larga fermentación hace que consigamos panes con más sabor, aroma, miga, una corteza estupenda, y lo conseguimos porque dejamos que el gluten trabaje un buen número de horas y porque le añadimos un gran porcentaje de agua para favorecer estas fermentaciones largas.
Podría ocurrir, dice Ibán, que cuando la saquemos del frigorífico no hubiera aumentado de volúmen y recomienda, como ya os he explicado yo alguna vez con otras masas que es muy bueno dejarla atemperar una horita o más si hace frío en la casa. A mí me ha subido perfectamente y la pinta era estupenda, pero aún así la he dejado atemperar un poco.
Enharinamos la mesa de trabajo abundantemente y con mucho cuidado cogemos la masa con las dos manos y le damos la vuelta sobre la mesa. Le damos forma de rectándulo sin aplastar mucho, siempre tratando la masa con delicadeza para no romperla y la partimos en dos trozos con un cuchillo grande y bien afilado, para conseguir dos barras lo más iguales posibles para un buen horneado.
En una bandeja grande extendemos la mezcla de semillas.
Nos preparamos un paño limpito algo humedecido al lado de las semillas.
Cogemos cada trozo de masa con mucho cuidado porque es muy blanda y la pasamos al paño para humedecerla un poco y enseguida la pasamos a las semillas. Para que quede más bonito sólo lo hacemos por uno de los lados.
Tendremos preparada una bandeja de hornear con papel sulfurizado.
Colocamos cada rectángulo sobre la bandeja de hornear con el papel con la parte sin semillas hacia abajo.
Y ahora viene lo más divertido. Cogemos de los dos extremos metiendo bien los dedos por la parte de abajo que en este caso será la que no tiene semillas como hemos dicho, pero teniendo la precaución de meter la mano derecha con los dedos hacia la izquierda y la mano izquierda con los dedos hacia la derecha. Tenemos que retorcer la barra al menos dos veces para que queda muy bonita porque conseguimos que se vean como partes con semillas y otras, alternadas, sin ellas. Es una verdadera preciosidad.
Dejamos que asiente un poco la masa un par de horas a temperatura ambientes, que como siempre os digo puede ser algo más si la casa es muy fría, sin tapar y sin corrienes de aire.
Cuando quede una media hora encendemos el horno y lo precalentamos a 250ºC.
Preparamos un vaso de agua fría y una bandejita justo encima del fondo del horno, pero que toque, no la pongáis en las baldas. De esta forma estará muy caliente.
Metemos la bandeja con las dos barras y echamos el agua a la bandejita de golpe. Cerrar la puerta enseguida y veréis como conseguimos una gran cantidad de vapor que favorece una buena corteza.
Pasados diez minutos bajamos la temperatura a 220ºC y retiramos la bandeja que seguramente no tendrá agua y así evitamos que se nos queme. Dejamos hornear otros 25 minutos y apagamos el guego pero dejamos el pan dentro con la puerta entreabierta otros 20 minutos o hasta que esté totalmente frío.
Nota: Los que me conocéis sabéis que soy una enamorada del pan. No tengo mucho tiempo para dedicarle pero sinceramente es una de mis pasiones, me encantaría aprenderlo todo y desde luego este libro de Ibán Yarza, "Pan Casero" de la editorial Larousse, es magnífico. Os lo recomiendo mucho, y además tiene un precio muy asequible.
Versión en inglés:
Ingredients: 475 g. bread flour, 25 g of wheat flour, 330 g. of water, 10 g. fine table salt, 5 g. Fresh baker's yeast or 1,5 g. dry yeast, 150 g. mixing of seeds, in my case I used black sesame, sunflower seeds and poppy
Elaboration: This dough is very easy to do, and also as you can see by the title of the post does not need to know kneading, but we do not need any knowledge in form masses for baking. It's as easy as it looks and proportions are accurate, of course. We are talking about Iban Yarza, one of the great master bakers who teaches us with their books to make bread at home quite naturally without complicate life, as with this recipe. As we will not amass, he recommends us to dissolve the yeast in a little water to the recipe, warm, about 25 ° C, we necsitamos What is that is neither hot nor cold, so that the yeast can start working and that is your favorite temperature. We do crushing between the fingers in a bowl of water helping. Set aside while preparing the remaining ingredients.
In a large bowl add the remaining ingredients, except the seeds, and mix vigorously. When you learn to knead bread, the teachers first thing they tell you is that this step do it with one hand, in my case clear, or right with a scraper baker, because this way you get the other free to work without stain. The Left in this case we will use to go circling the bowl while we mix the ingredients to make sure that integrate seamlessly. We add the water with the yeast and continue integrating. In two or three minutes it will be more than ready. We're not kneading, the ingredients are joining. It should be a very sticky dough because of their high water content, fijaros which is 66% of the total recipe. If it were not adding a tablespoon to scoop some water to get that effect sticky and wet. Now we must let stand five minutes, unless it is very cold, which could be 10 perfectly. After the first rest we take with one hand as a third of the mass by one edge, lengthen hard up and us, and we turned on itself. Cover with plastic perfectly to keep out any air and not dry and store in the refrigerator overnight. The cold is good friend of the masses, help them mature, long fermentation makes breads get more flavor, aroma, crumb, great crust, and we got it because we let the gluten work a number of hours because he add a large percentage of water to favor these long fermentations. Could happen, says Iban, that when we remove from the refrigerator there was increased volume and recommends, as I have already explained I ever with other bodies which is very good temper leave for an hour or more if it is cold in the house. To me he has gone perfectly and painted me was great, but still I left her temper a little. Generously floured work table and carefully we take the dough with both hands and we turn on the table. We shape of uncrushed rectándulo much, always trying dough gently to not break and break in two pieces with a large, sharp knife, to get two bars as equal as possible for a good baking.
In a large pan extend the seed mixture. We prepared a slightly moistened seeds next camaraderie cloth. We take each piece of dough carefully because it is very soft and we had to moisten the cloth slightly and immediately had to seed. To be more nice to just do it for one side. We prepared a baking sheet with parchment paper. Put each rectangle on baking sheet with paper with the hand seeded down. And now comes the fun. We take the two ends sticking fingers through the well bottom in this case will not have seeds as we said, but taking care to stick your finger right to left and left hand with fingers clockwise. We have to twist the bar at least twice so that is very nice because we get to look like seeds and other parts, alternating without them. It's a real beauty. We let the dough settle a bit a couple of hours at ambient temperature, as always I say can be more if the house is very cold, uncovered and without corrienes air. When half an hour left turn on the oven and preheat to 250 ° C. Prepare a cup of cold water and a tray just above the bottom of the oven, but it touches, not do them on the shelves. This will be very hot. We put the tray with the two bars and pour the water into the small tray at once. Close the door quickly and see how we get a lot of steam that promotes good crust.
Ten minutes later the temperature down to 220 and removed the tray that surely will not have water so we avoid burning. Let bake another 25 minutes and turned the bread guego but left the door ajar within another 20 minutes or until completely cold.
Note: Those who know me know I'm a lover of bread. I do not have much time to spend but honestly is one of my passions, I would love to learn everything and certainly this book Iban Yarza, "Homemade Bread" in the Larousse publishing house, it is magnificent. I highly recommend it, and it has a very affordable price.
Ingredientes para el yogur:
- 1 yogur natural desnatado
- 1 litro de leche
Ingredientes para la mermelada de fresas especiada:
- 1/2 kg fresas limpias .
- 150-200 g. de azúcar moreno 150-200 g.
- especias y bayas, canela en rama, cardamomo, pimienta rosa, clavo de olor, anis estrellado, jengibre rallado...
- 50ml. agua
- limón, un par de cucharaditas de zumo y su ralladura
- naranja, un para de cucharadasde zumo y su ralladura
Elaboración de la mermelada de fresas especiada:
En un cazo alto ponemos las fresas junto con el resto de los ingredientes y dejamos cocer a fuego lento no menos de una hora removiendo de vez en cuando para que no se pegue. Debe consumirse totalmente el líquido y quedar una mermelada espesa. Yo no he retirado las especias, ni las bayas, primero porque sabía que la iba a utilizar enseguida y en segundo lugar porque me parece que le da una connotación algo distinta de la mermelada usual que podamos hacer o comprar. Además no troceo ni antes ni durante la cocción la fruta para poder masticar la fresa. Pero si no os apetece esta idea podéis hervir las hierbas y las bayas en una bolsita que podéis hacer con un trapito limpio, o como hacemos en la cocina en la que trabajo en un gorro de los que usan las visitas, que son desechables, hemos descubierto que aguantan perfectamente la cocción. Es decir, hacer un atadillo y así lo podréis retirar con facilidad. En cuanto a las fresas, podéis cortarlas en trocitos pequeños o ir aplastándolas según se vayan ablandando en la cocción, incluso pasarla por un chino o pasapurés y convertirla en confitura. También podéis variar el punto de azúcar, yo no añado más de un 30% sobre el peso de la fruta, pero si os gusta muy dulce puede soportar entre un 50 y un 75%.

Elaboración de los yogures de mermelada de fresa:
En la base de los vasitos ponemos un par de cucharadas de mermelada. Aunque por supuesto podéis hacerlo recién hecha, es muy aconsejable dejar que enfríe toda la noche en un tarro de cristal abierto y dejarla después en el frigorífico para que coja cuerpo y madure, pero no es imprescindible para esta elaboración tan sencilla. Añadir una cucharadita y media de yogur y completar con leche que puede ir algo azucarada si os apetece. Yo no le añado más azucar porque considero que con el dulce de la mermelada es suficiente y además queda la opción de que cada uno lo azucare a su gusto.
Cerrar los tarritos y dejar que la yogurtera haga su trabajo toda la noche. Enfriar.
Adornar con unas fresitas frescas o simplemente remover para que se mezclen los sabores. Realmente es un placer.
Nota: sé que mucha gente cree que no merece la pena hacer yogures en casa, y es verdad que económicamente no hay ninguna ventaja. Pero os puedo asegurar que la diferencia y la variedad de yogures que se pueden hacer es tan grande y están tan ricos, que una vez que los pruebas no vuelves a comer uno comprado. Desnatados, con azúcar, con algún tipo de edulcorante, de sabores... Me he vuelto adicta y no me gustan los yogures, bueno eso creía yo.
Otra nota: podéis preparar estos vasitos de yogur con cualquier mermelada, incluso comprada¡¡¡¡¡¡¡¡
Versión en inglés:
Yogurt ingredients: fat plain yogurt 1, milk, 1 liter
Ingredients for spicy strawberry jam: clean strawberries, 1/2 kg., brown sugar, 150-200 g., spices and berries, cinnamon, cardamom, pink pepper, cloves, star anise, grated ginger ...
water 50ml., lemon, a few tablespoons of juice and zest, orange, for scoops and zest
Development of spicy strawberry jam: In a high saucepan put together with the remaining ingredients and cook strawberries simmered no less than an hour, stirring occasionally to prevent sticking. It should totally consumed the liquid and become a thick jam. I have not retired spices or berries, first because I knew he was going to use right away and secondly because I think it gives a somewhat different conntación of the usual jam that can make or buy. Also I do not hash before or during cooking fruit strawberry to chew. But if you do not fancy the idea you can boil the herbs and berries in a bag that you can do with a clean cloth, or as we do in the kitchen where I work in a cap of using visits, which are disposable, but We discovered that perfectly withstand cooking. Ie make a atadillo and so able easily removed. As for strawberries, you can cut them into small pieces or crushing them go as they go softening in cooking. You can also vary the sugar, add not more than 30% of the weight of the fruit, but if you like really sweet can support between 50 and 75%.

Production of yogurt with strawberry jam: At the base of the cups we put a few spoonfuls of jam. Though of course you can do it freshly made, it is advisable to let cool overnight in open glass jar and leave later in the refrigerator to take body and mature, but not essential for this very simple processing. Add a teaspoon and a half of yogurt and milk complete with something sugary can go, if you fancy. I will not add more sugar because I think the jam is sweet enough and also have the option of everyone to Sweeten to taste.
Close the jars and let the yogurt do its work overnight. Cool.
Garnish with a few fresh strawberries.
Note: I know that many people believe that not worth making yogurt at home, and it is true that there is no advantage economically. But I can assure you that the difference and variety of yogurts that can be done is so great and are so rich that once the tests come back from eating one bought. Low-fat, sugary, with some kind of sweetener, flavor ... I am addicted and I do not like yogurt, well so I thought.


